
Making the Matte Painting
- emersonharrop
- Mar 28, 2022
- 2 min read
Updated: May 10, 2022
In Unreal, the first thing to do was to render out the main 3D part as an alpha channel so that the sky wouldn't render out. This decision was made as not only does it make it much easier to place things between the two layers as masking wont be required but also the sky in the Unreal scene looks lifeless and empty.


The first thing that was done was replacing the sky. Starting off with an image of a desert sunset that looks similar in lighting to the Unreal render and the sun position has to be in a similar spot to where the shadows are being cast in the render image and then cut out the ground only leaving the sky.
After cutting out the ground, move the sky over the the render and place it in the canvas. Use the paint brush tool to paint in the parts that are missing using the colour dropper to copy the shades of the sky so that the paint seamlessly fits with the image.


The canyons were rendered out in separate individual layers so that in photoshop, they would have the freedom to be moved around. With only the main light coming from the directional light, it left the side of the canyons facing the camera dark where little to none of the details can be seen. So using some reference images, spot lights were used to light up the dark parts of the canyons a little bit. This made them look much more realistic as items aren't just completely black if they don't have direct light hitting it as seen in the two reference images. Once they were placed in Photoshop, adjustment layers like contrast and hue etc. were used to make them fit in with the main part of the images.


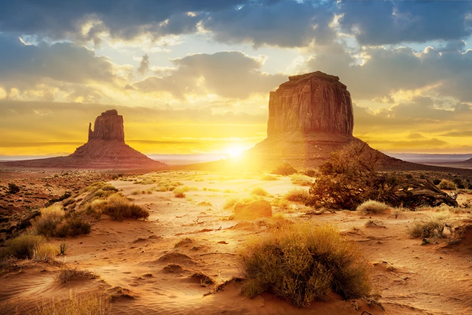


The next thing to add were the clouds. This was done using a brush that was created to look like a cloud. The reference image was used to capture the orange glow the clouds have which was done by copying the layer of the cloud, making it slightly bigger and changing the colour to orange.


The dust was then added using some dust bushes downloaded online. The dust in the distance was made to look much thicker as its further away and the dust in the midground was thinner as it much closer.


One of the last things that was done to this was re rendering out the assets right Infront of the camera as like the canyons, they were far too dark. So they were given some spot lights to light them up a bit in Unreal. Once the renders were imported over the original image they seemed a little too bright so to fix this, they were simply painted over with a black paint brush with the opacity turned down.

To create the final painting, The layers were re arranged to make the horizon line look much nicer and then a paint layer was applied to the canyons to make the top part lighter and to darken the gaps between the canyons just to make them stand out a bit more.


Comments