
3D Scanning
- emersonharrop
- Nov 8, 2021
- 3 min read
Updated: Nov 29, 2021
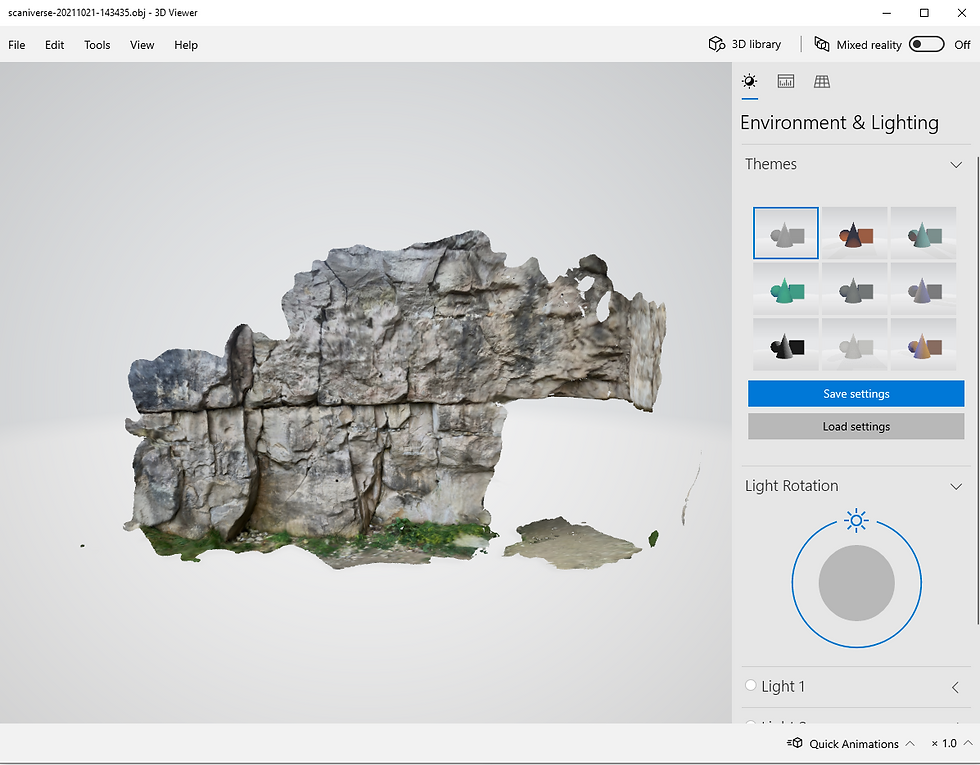
The image below is a 3D model of the side of cliff that I 3D scanned using an LiDAR scanner. This was done by simply using the LiDAR tablet and recording all the cliff side using the scanner app. When scanning, you have to press the record button and start moving the camera around the surfaces area. When scanning the objects, red lines will appear where it hasn't been scanned, to get rid of these, simply move the camera around the object. As the lines disappear, it has scanned that area. Whilst scanning, make sure to move the tablet slowly so that the LiDAR picks up all the details otherwise the object may not scan properly and the 3D model may not form properly in 3D software and/or the textures may be stretched. This can be bad if the model is near the front of the scene or the focus of the shot. If its in the background in the distance then it may be ok depending how badly and obvious the stretches in the texture is and how far from the camera the object is.
This asset will be used to build the canyon cliffsides in the establishing shots at the start of my scene. The problem with using this and other subjects like this that I have scanned is that they are only small parts of the bottom of cliff faces and not a whole canyon. So I wont be able to create the entire thing out of these one alone, ill have to combine all the assets together to create the whole thing. Also the fact that these cliff faces are from a quarry mine and not sand stone might be another issue as they don't have the right texture or structure. However, if I use them in the far distance in the background and change the shade of the texture to a sand stone colour, I should be able to get away with it. These assets are only the side to the cliff and don't have the top. This means that in the scene ill have to model my own plane to add it to the top of the canyon for these cliff faces.
One of the only real difference I noticed between photogrammetry and LiDAR scanning is that the scans form the 3D geometry as you scan the subject. This meant that the step of putting images into a software and waiting for it to generate the 3D geometry was completely skipped meaning I could go straight into Maya and retopologize the asset.
For the re-topologizing, I decided to use Maya's quad draw tool (like I did for the rock) and it was exactly the same process when re-topologizing the rocks with the main difference being that the rocks were 3D objects so it was a bit easier to have the edges not flow properly than it was on these 2D scans.


Originally I did try another way to retopologize these 2D scans. This method was using a topologizing tool in Maya that did it automatically. To do this, select the model and separate it. Once that is done the hard edges needed to be softened, to do this go to mesh display then select soften edge and then go to display polygons and show hard edges (so that the hard edges are visible). Then the final step is to highlight a section of the model and go to mesh and click retopolgize. This should automatically retopologize that section of the model. The reason I decided against using this method is because it is difficult to judge the right amount of edges on each section so that they all lined up with each other. After discovering the quad draw tool, I actually found that one much easier and quicker to use.


After re-topologizing the scanned asset, I then unwrapped the new object to prevent stretching on the UVs by placing cuts where stretching was present. I tried to place the cuts in places that weren't too visible but some of the spots the where the stretching was meant that I had to place a small seem which is slightly visible but considering that I'm using these in the background of my scenes, any visible seams wont be noticeable in the final animation.


Like with the photogrammetry, I then took the asset to Zbrush and sculpted some of my own details on to it. Using tools like the flatten and slice brushes as well as the alpha brushes.


Once again, I chose to use mega scan materials instead of the material that came with the scan as sandstone textures are what I need for my scene. After having finished with the texture, I then placed my cliff face into my pre viz of my establishing shot for my project.


Comments